
As the temperatures drop and the roads turn slick with salt and grime, your bike faces its toughest season. Winter riding brings rain, slush, and road spray — all of which quietly attack your drivetrain, dull your frame, and shorten the life of your components. What keeps you entertained on the road can leave your bike cold, dirty, and vulnerable.
Winter Bike Care Guide: Keep Your Ride Clean & Smooth

That’s where a bit of smart maintenance makes all the difference. With the right routine, you can keep your bike looking sharp, running smoothly, and ready for whatever the winter throws at it. Regular cleaning, a touch of protection, and consistent lubrication will go a long way toward preventing corrosion and costly repairs.
At SHIFTA, we’ve put together a practical winter bike care guide based on real-world riding and tested maintenance methods. Whether you’re commuting through city slush or tackling weekend rides in the countryside, the steps ahead will show you how to clean, protect, and maintain your bike through the colder months – simply, effectively, and without overcomplicating things.
Before the frost really sets in, it’s worth setting up a small winter care routine, your future self (and your gears) will thank you. Let’s start by tackling the first and most important step: giving your bike a proper deep clean.
Step 1: Deep Clean – Get Rid of Winter Grime
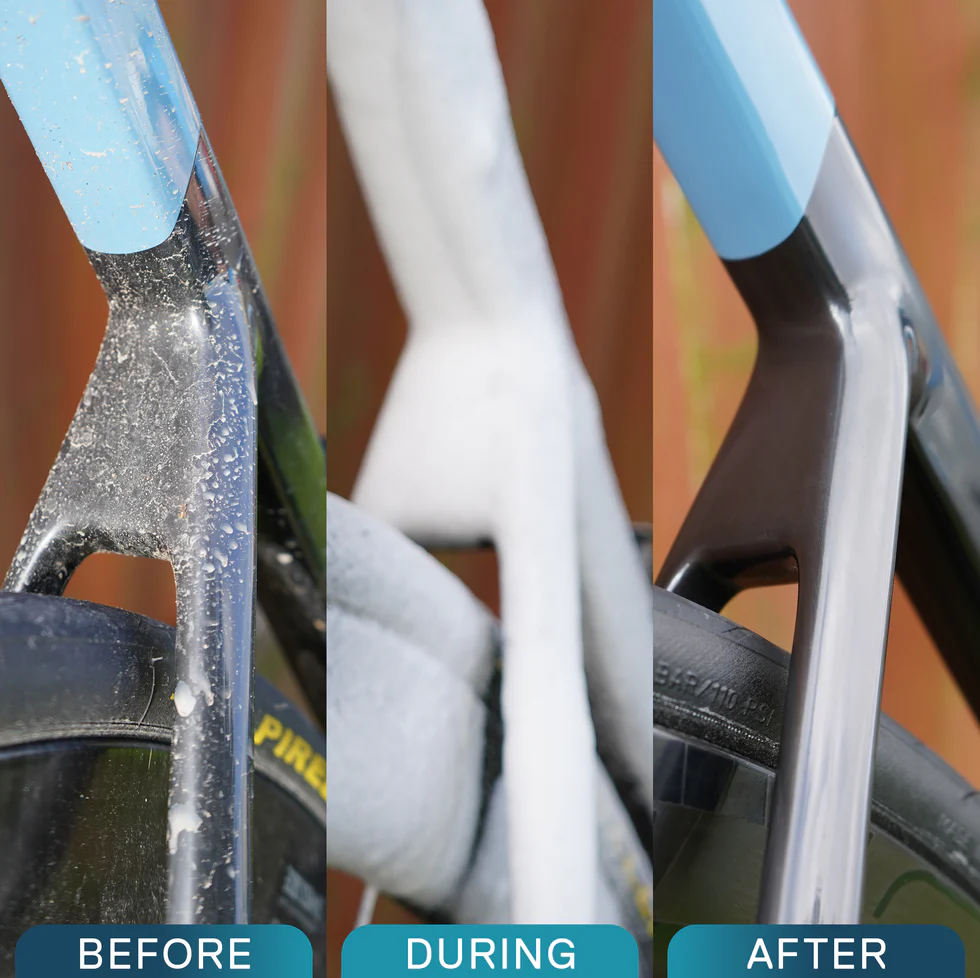
Winter riding leaves your bike coated in a mix of salt, mud, and oily residue that slowly eats away at metal parts and dulls your paintwork. A good clean isn’t just about appearances – it’s about protecting your bike from corrosion and wear.
Start by rinsing off the worst of the muck with clean water to loosen grit. Then, spray on your chosen bike cleaner. If the bike’s really filthy after a wet commute or muddy ride, a snow foam cleaner is ideal – it clings to the frame, wheels, and components, softening heavy grime as it sits. For lighter, everyday cleaning, a standard spray-on bike cleaner works perfectly and is quicker to apply.
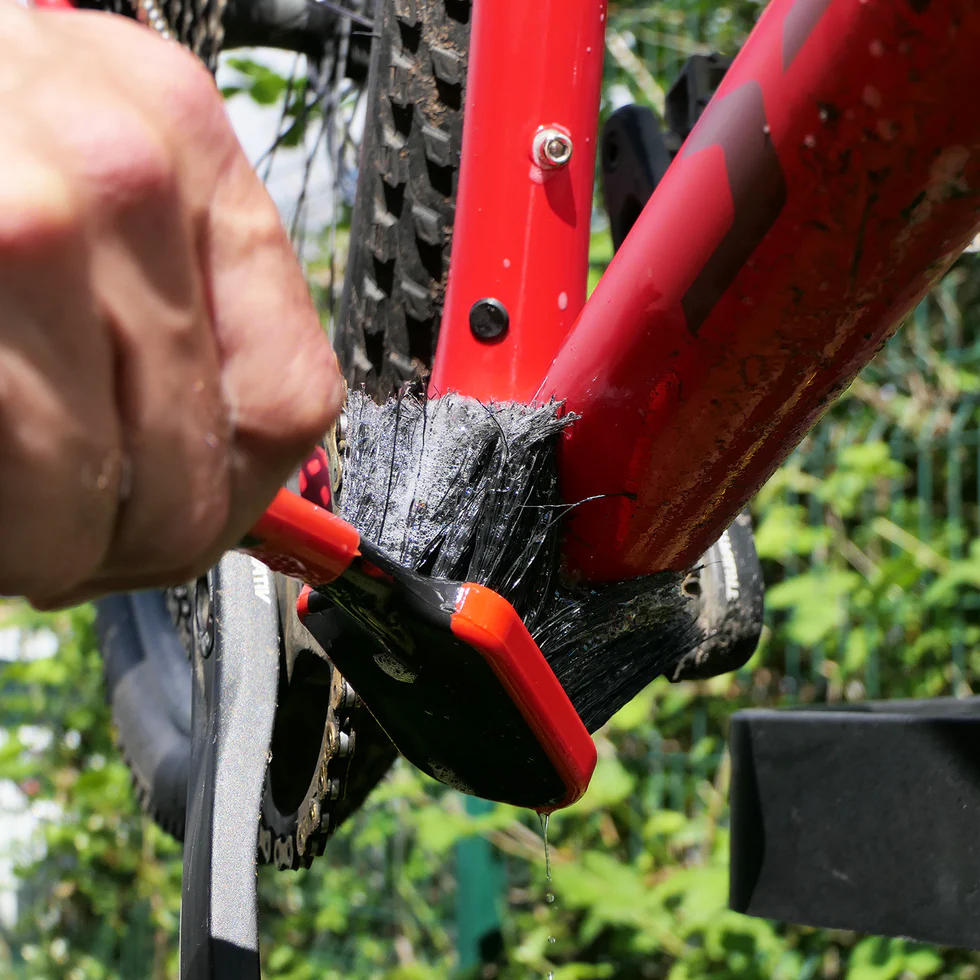
Once sprayed, leave the cleaner to sit for a minute or two. This gives it time to break down dirt and road film without scrubbing. Then take a soft-bristled brush and gently work over the frame, chain stays, hubs, and drivetrain. Focus on the areas where grime tends to collect – underneath the bottom bracket, around the rear derailleur, and along the rims or rotors.
When you’re done, rinse everything thoroughly with clean water, making sure to remove any leftover cleaner. Avoid using a pressure washer close to bearings or seals; a steady flow from a hose or bucket is plenty. Finally, dry the bike with a clean towel or microfibre cloth to prevent streaks and water spots.
By giving your bike this short, structured clean after wet or salty rides, you’ll keep dirt from building up and stop corrosion before it starts – making every other part of your winter maintenance routine easier.
Step 2: Protect & Seal – Keeping the Elements Out
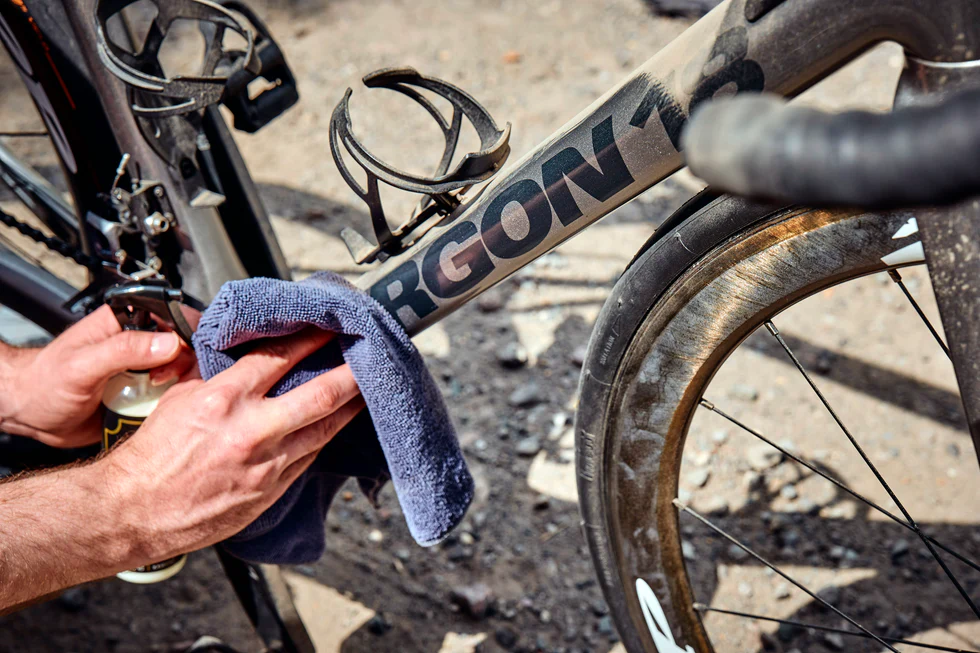
Once your bike is clean and dry, the next step is to give it a little defence against everything winter can throw at it. Road salt, slush, and rainwater don’t just make a mess – they work their way into bolts, paint, and components, slowly dulling finishes and encouraging corrosion. Adding a protective layer helps create a barrier that keeps grime from sticking and water from seeping in.
A ceramic-based protection spray or coating is ideal for this. It works a bit like a rain jacket for your bike – forming a thin, invisible layer that repels water and dirt. It also gives paintwork a subtle shine and makes future cleaning much easier since mud and salt are less likely to cling in the first place.
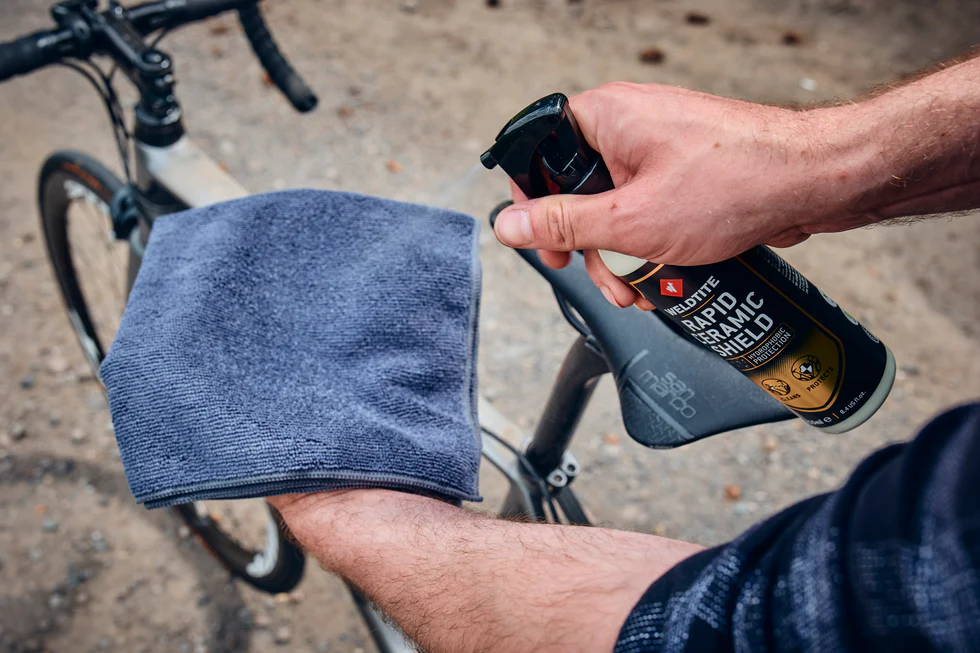
To apply it, start by making sure the bike is completely dry. Spray the product lightly onto a soft cloth (rather than directly onto the frame) and wipe it evenly across all painted and metal surfaces – frame tubes, fork legs, cranks, even wheel rims. Avoid braking surfaces and drivetrain parts. For best results, buff it gently with a clean section of the cloth to help the coating settle and shine.
This protective layer doesn’t just make your bike look good – it saves time later. When you rinse off your next round of winter grime, you’ll notice the water beads and dirt slides off more easily. Reapply the coating every few weeks or after a deep clean to keep your bike shielded right through to spring.
With the frame and components now protected, it’s time to turn your attention to the moving parts – the chain, gears, and drivetrain – where winter’s wear and tear hits hardest.
Step 3: Keep It Running Smoothly
With your bike clean and protected, the final step is to make sure the parts that move keep moving smoothly. Winter is especially tough on drivetrains – cold, wet rides wash away lubrication, while road grit and salt grind into the chain, cassette, and derailleur pulleys. Left untreated, it leads to rust, stiff links, and worn teeth long before spring arrives.
A good all-weather lubricant is your best defence. It’s designed to handle both wet and dry conditions, resisting water washout while keeping the chain slick and quiet. Think of it as your bike’s winter moisturiser – it seals out moisture and reduces friction where it matters most.
Here’s how to apply it properly:
- Make sure the chain is dry and free of dirt.
After cleaning, wipe it thoroughly with a cloth. Any leftover moisture or grit will stop the lube from bonding. - Apply one small drop of lubricant to each chain link.
Turn the pedals slowly backward as you go, keeping things neat. More isn’t better — too much oil attracts dirt. - Let it sit for a few minutes to soak in.
This helps the lubricant reach the rollers and pins inside each link. - Wipe off any excess with a clean cloth.
The outer plates of the chain should look clean and dry to the touch — that’s how you know the lube is only where it needs to be.

Reapply after every few wet rides, or whenever the drivetrain starts to sound dry or squeaky. A well-lubed chain will shift smoothly, resist corrosion, and make every pedal stroke feel effortless – even when the weather’s at its worst.
With your bike now clean, sealed, and running smoothly, the hard work is done. The final step is simply keeping on top of it – a small, regular routine that keeps winter riding stress-free.
Step 4: Routine Care Made Simple
Step 4: Routine Care Made Simple
Winter bike care doesn’t have to feel like a chore. The secret is keeping it small and regular – a few minutes here and there that prevent problems before they start. Once you’ve got your deep clean and protection sorted, staying on top of it becomes quick and easy.
Here’s a simple routine to follow through the colder months:
After Wet or Salty Rides
- Give the bike a quick rinse to remove road salt and grit.
- Spray on your cleaner, let it sit briefly, then brush and rinse.
- Dry everything with a towel or microfibre cloth.
- If the chain looks dull or dry, add a fresh drop of lube and wipe off the excess.
(Takes about 10 minutes and saves hours of work later.)
Once a Week
- Do a slightly more thorough wash — use the snow foam cleaner if grime has built up.
- Check brake pads, tyres, and bolts for wear or debris.
- Wipe the frame and reapply your ceramic protection if needed.
Once a Month
- Give your bike a proper deep clean: drivetrain, frame, and wheels.
- Refresh your ceramic coating to keep the water-repelling finish strong.
- Inspect cables, gears, and bearings for signs of corrosion or stiffness.
A little consistency goes a long way. Keeping this routine through winter means your bike will glide through cold, wet months without complaint – and when spring rolls around, you’ll be ready to ride without any post-winter repair bills.
Your winter kit doesn’t need to be complicated – just a good cleaner, a soft brush, a protective coating, and a reliable all-weather lube. Together, they keep your bike clean, smooth, and ready for whatever the season brings.
Keep Your Bike Winter-Ready with a Little Routine Care
A clean, protected, and well-lubricated bike doesn’t just look good – it performs better, lasts longer, and makes every winter ride more enjoyable. With a little attention after each ride and a regular monthly refresh, you’ll glide through the season without the usual creaks, corrosion, or costly repairs.
Everything we’ve covered in this guide is easy to do at home. You don’t need a workshop or fancy tools – just a few quality essentials and a few minutes of care.
If you’d like to see the products mentioned throughout this guide, you can find them all here:
- Snow Foam Bike Cleaner – for deep winter cleans
- Lime Bike Cleaner – for quick mid-week washes
- Rapid Ceramic Shield Kit – to protect and seal your frame
- All-Weather Lube – to keep your drivetrain smooth
- Softwash Brush – for gentle, effective cleaning
Each one is designed to make winter maintenance simple, effective, and satisfying — so you can spend less time cleaning and more time riding.
At SHIFTA, we’re here to help riders look after their bikes year-round, from quick post-ride wipe-downs to full seasonal care. Explore our full maintenance range, or check out more of our cycling guides for practical, real-world tips to keep your bike performing its best in every season.
Rewards on SHIFTA
Shop with SHIFTA and earn rewards through the FREE prize draws. You earn tickets every time you visit, review and engage with the SHIFTA platform. Follow our journey on socials too… You can find us on Instagram and Facebook.